
“The only thing that works on an old boat is the owner”
SV Saga Sea Refit Progress from May 2011 to January 2014
Saga Sea arrives at Kemah Boardwalk Marina under her own power May 2011 for refit by her new owner.
The plan is to do the work on the boat here in the water while living on another boat that my wife and I own close by.
Yes, I planned to keep both boats but like a lot of things, I know better now.
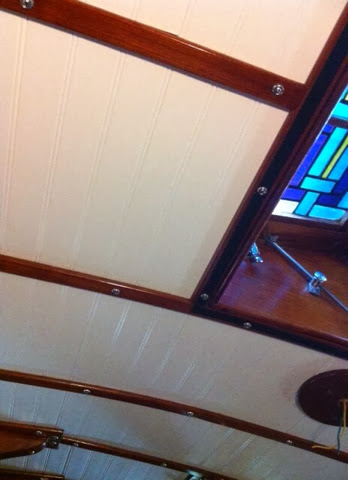
After the settled boat price, survey, insurance, taxes and Coast Guard documentation was paid, there wasn’t a whole lot of money left for expensive replacements. My labor was free so I first concentrated on replacing the old vinyl headliner that was backed with plywood. PVC bead board paneling was chosen as a replacement material. I had seen someone use them on a refit that was posted online. I believe it took 3 months (just the weekends) to complete this but the results made it worth the work. The main hatch had some plywood pieces that where rotted. Those were removed and I glassed and epoxied it for strength. I added PVC panels to the underside of the hatch to finish it out.
The boat originally had a fiberglass propane box located on the focsle. It was bolted thru the deck and was dripping water where my wife and I sleep. This was no bueno!
This thing was big too. It looked like some big white cooler up there. I removed it, glassed the holes and removed the propane hose. The new fiberglass tanks would live aft port and starboard on the push pit. One of them fuels an outside grill and the other fuels the cabin stove. The system is simple and requires no electricity. For the cabin stove, there is a regulator at the tank and the hose runs thru the cockpit coaming to a shut off valve inside and then below to the stove. It’s one of those fireplace gas valves. I can turn it off and on from the galley.
This allows me to close the valve (above on deck) after cooking and see that the gas has stopped before turning off the stove. My wife and I would like to have a broiler so the stove/oven will be replaced shortly with a Tasco 755 LP. I will probably add a taller sea rail to it but we shall see.
The Cabin Sole. This thing would creek so loud when walking on it, that I couldn’t stand it. Also the bilge hatches would get stuck. The frames supporting the sole panels were 2” square teak pieces and they would flex. I stiffened these up by sistering them with 1/8 aluminum 2”x2” angle pieces. They were thru bolted and glued to the existing teak frames. I then sanded the bilge hatches and screwed down the other sole panels. This has been an on going battle but I’ve just about got it won. There are 2 panels that need to be stiffened up.
The Union 36 has a lot of teak and the existing varnish on the exterior was in bad shape.
There is a product called Teak Guard that I decided to use mainly because of its easy application and removal. In the past when I varnished, water would get underneath when the boat flexed. The task at hand was to remove the existing varnish first. This was accomplished with a heat gun, scrapper and sand paper. Here is a list of teak items on the boat’s exterior: bulwark, hull cap rail, rub rail, hand holds, eye brow, forward hatch, butterfly hatch, main hatch, bow sprit, bumpkin and cockpit cap rail. These are all being kept up with teak guard now with 6 month frequency.
During the sea trial it was discovered that a seam in the mainsail had come apart. I had always wanted to try a battenless main and thought this was my chance. I took it to Banks Sails and requested that the sail be re cut with a hollow leech, removed the headboard and repair the seam. It’s kind of like a big jib. A leech line keeps the edge from flapping. Sail rite sells a 1 ¼” grommet die set that I used at the head, tack and reef points. I learned about this type of main from a Lynn and Larry Pardey book but have also discovered many other cruisers use them as well because there are no batten pocket to fail, no head board to chafe and you can put it up or down at all points of sail.
The boat came with lots of sails, some from other boats.
Here is a list of what was kept along with rig changes.
Main - re cut the sail – I also changed the mainsheet to end boom sheeting with an endless line. The boat came with an Isomat single line reefing boom. This system was replaced with slab reefing quite easily using the existing sheaves in the boom and winch below on the mast. Lazy jacks were installed and combined with the boom topping lift without the fear of battens getting caught in them. A ½” nylon lined block and tackle main sail boom preventer was rigged that is cam cleated back at the cockpit. (Another Lynn and Larry Pardey copied system)
Storm Trysail – I added a separate track to the mast for this sail. It lives on deck attached to the track and ready to be used.
Hank on Staysail – I removed the club boom and added block for the sheets on the cabin top.
Hank on Yankee
Hank on 135 % genoa – This sail stays hanked on below the yankee on the forstay. When the genoa is use the yankee is moved to a magazine line so that the genoa can be used.
100 % genoa stored below under the v birth.
Drifter – stored under the dinghy. This was ripped but had Banks fix and add 3 hanks. This sail is so light that it is only good up to 8 knts. – The pole for this sail lives vertically on the mast hooked to a car on a mast track. The car ring was mangled so it was replaced.
I had a 10’ nesting dinghy that I built for the Alberg 30. There was room for an 8’ dinghy on Saga Sea aft of the mast but not a 10’ one. I decided that the nesting dinghy was too much trouble to assemble and my friend had an 8’ Walker Bay for sale that fit just right.
The sailing rig got transferred from my old nesting dinghy to the Walker Bay and I made a floatation ring using 6” fire hose and closed cell foam (swim noodles). The boat isn’t so tender now and I can sail it, row it or put a 3 hp engine one it. It’s launched quickly using a halyard tied to a bow and centered stern line. The little boat rotates from upside down to right side up on this axis before going in the water.
After saving, the first of many big money item that was purchased for the boat was a new 16000 btu air conditioner/heater. I replaced the existing unit with the same brand and type, a Cool Breeze. They are out of Florida. The unit just dropped in where the other one was. I did add another 30 amp circuit to the boat for the Air Conditioner because the microwave, hot water heater and other loades were tripping the main breaker. Also after a while a large bronze strainer was added to replace the smaller from the previous AC. The old AC also had 6” pvc for duct work. This was replaced with insulated ducts that keep the mold down.
By around October of 2011 it was discovered that the Thorny Croft engine was seized. I think that water got into at least one of the cylinders. I tried some different things but couldn’t ever get it to turn. Like a lot of things on the boat I kind of expected to replace it anyway at some point. It was decided that I would sell our Alberg 30 “Revolver” and use those funds to buy a new engine, prop, shaft and whatever else was needed for that system. Revolver was being neglected because of all of the work being done on Saga Sea so it needed to go to a new owner anyway.
Revolver was sold in the summer of 2012 and a new Beta 38 diesel engine was chosen as a replacement. July was spent removing old engine items that were small enough and prepping the area for the new engine. Saga Sea has 2 fiberglass diesel tanks located just forward of the engine with inspection plates on the top. I pumped out the fuel and cleaned the tanks.
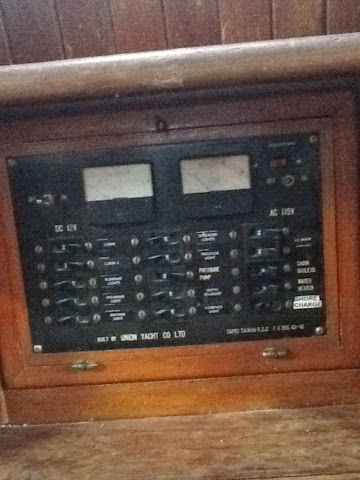
To help with alignment of the new engine, a friend of mine suggested that I clamp the prop shaft in its current location so that when the Thorn Croft engine was decupled and removed, the shaft could be used as a guide to position the new engine. Beta suggested that I move the control panel location from the cockpit foot well. When I removed the original engine control panel the gauges where not sealed which if the cockpit well filled with water, it would have flood the engine panel and let water in behind it. On the other side of this panel was the main switch panel for the entire boat! I took Beta’s advice and positioned the new engine control panel high in the cockpit. Also, I covered it with a bronze port light. The old area was filled with fiberglass and sealed from water ingress.
The boat was towed to Seabrook Shipyard on 8/9/2012 and hauled.
Here is how the engine project worked out.
I used a 4x4 pine beam over the hatch with a block and tackle to move the engine off of its mounts and onto a protected cabin sole just below the main hatch and hired a crane to pull the old engine out thru the companion way and then placed the new engine onto the cabin sole. After cleaning and painting the bilge, I bolted on ½”aluminum angle onto the existing engine bed. This was needed because the new engine was 5” narrower than the old one. I moved the engine onto the aluminum angle rails using block and tackle attached to the companion way beam. Moving the engine was not nearly as hard as I thought it might be.
After getting the engine set to the old shaft, the engine mounts were bolted to the aluminum rails. I then removed the shaft and had it checked. As I expected it had to be replaced with a new one. A new 3 bladed prop from Michigan Wheel was added with a PSS shaft sea and new shaft. After getting all the systems - fuel, cooling, exhaust, throttle and electric installed, the boat was put back in the water with no leaks. I got the engine started but it soon stopped. It was a fuel problem with the Racor 500fg water separator that I tried to rebuild.
I ran out of time at Seabrook Ship yard so I had the boat towed back to Waterford Harbor Marina. There I replaced the water separator and primed the fuel system and the engine started. The water temperature and oil pressure alarms would not go off, though. The engine schematic showed that the sensors for oil pressure and water temperature looked different than what I had for the control panel I had chosen. After Beta sent the new sensors I installed them and that fixed the problem. Next, the Optima AGM starting battery stopped working and had to be replaced. This was done in October 2012 with a group 31 1000 MCA AGM battery from west marine.
The repower was complete!
On to the next project!
The closed turnbuckles that the boat came with had a bad reputation for breaking so I replaced them with bronze open body ones. I ended up having to shorten the standing rigging because of the new turnbuckles were longer so I got to know my wire very well. The boat has 4 sizes of 1x19 wire!
¼” for the forward lowers, 5/16” for the caps, staysail and whisker stays and running backs, 9/32” for the lower backs and 3/8” for the forestay, bob stay and back stay. There were 14 turnbuckles in all including the stays for the bowsprit. Not wanting to waste, I was able to make belay pins out of the old closed body turnbuckles for the fife rail at the mast.
Chain plates were next to be replaced. The existing plates where imbedded in the hull and could not be removed without destroying a lot of interior stuff. I decided to keep them in as backing plates and attach new ones to the outside of the hull. Six of these bad boys had to be made. I chose 3/8” silicone bronze and was able to order the pieces so that there wasn’t that much cutting that needed to happen. In fact cutting was done with a jig saw and smoothed with a grinder. The hard part, that ended up not being so bad, was the bending to the shape of the hull. First I took 1/8” aluminum to get the shape of the hull at each plate location. The new chain plates were to be 30” long so I needed to put a gradual radius in them with a bind at the top to be in line with the stay being attached. To do the bend I used a bench vice and a car jack. At first I thought I needed heat on it for it to work but the silicon bronze was soft enough to make the bends without it. To remove the existing bolts I drilled a small pilot hole along the side of the bolt from the outside hull then from the inside were the hole appeared I drilled a 2.5” hole using a hole saw up to the existing chain plate. From there I could put a wrench on the nut and remove the bolts. The new plates went on with new silicon bronze bolts and butylene tape to seal the water out. I was very glad when this project was completed and they make the boat look salty too!
The electric system was redesigned. I chose to keep the original switch panel below the companion way and hide some additional switches that were needed on the starboard side facing the pilot birth. The teak stays on either side of the main switch panel had to be replaced because of obsolete switches that needed to be removed. All of the cabin lights where replaced with LEDs. The old stainless steel and glass dome fixtures where reused and upgraded with SCAD Sensi bulb soft white. The galley and nav station got Aqua Maputo red/white lights. A new Hella steaming light fixture was added to the mast and wiring for the mast tri color was fixed. The other external lights (stern, bow port and starboard, spreader lights) were functioning.
I decided to replace the refrigeration system with an Alder Barbour Super Cold machine but am just using the air cooled option currently.
When doing this I added 6 Trojan T105 batteries with battery box, Victron battery monitor, new fuse box, 2 140 watt solar panels, Morning Star 45 Amp Solar Regulator and a 10 amp smart charger that I had in storage. The solar panels were mounted on the aft port and starboard rails.
I installed the fridge in February 2013 but by April it wasn’t staying cold. A Lakewood repairman came to check it out in May and found that it didn’t hold pressure but couldn’t find the leak. This ment that it could be replaced under warranty! Yes! Finally something I didn’t have to install. They came and did this in mid May and it has worked since.
Drinking Water –
I do not have a water maker on board so it’s important to know how much water I have in our drinking water tank and also to be able to pump water out of it, even if we lose electricity. A friend of mine had a Seagull V water filter and I was impressed with the way their water tasted. The filter is a .4 micron unit that will work with a foot pump. I installed one of these and plumbed it so that we can use either DC pressure water or a foot pump. I also installed a hand operated pump at the galley sink that is unfiltered. At the inspection port I drilled a whole and place a flange with plug. This is for a dip stick to measure the water. We discovered that the tank holds 150 gallons when filling and marking the new dip stick.
Head/Shower
The boat has a head and shower cabin that takes over the thru path going from the main salon to the v-birth when the doors are closed. There is a teak shower great and a fiberglass piece below that which funnels water down a drain. I installed an Atwood shower sump that attached to this drain and pumps out to a tee in the sink drain. I also installed new sink faucets and Ambassador Marine shower in the head cabin. A Lavac manual head was chosen and installed with two Y way valves. New pick up tubes had to be glassed into the holding tank. The system allows pumping directly overboard, pumping into the holding tank, pumping out of the holding tank overboard or having a dock pump out station pump the holding tank from the deck. The Y valves can also be locked into place for the health official of the country we are visiting. I installed a Groco strainer on the water intake for the Lavac to keep the sea bugs out but in dirty water harbors we just use the shower wand from the Ambassador shower to rinse the toilet bowl with fresh water.
Now for the ground tackle, The boat came with a Sampson Lawrence Sea Tigress 555 with a cast aluminum housing. This was lag bolted to the bow sprit. This was no bueno!
I corrected this by saddling it over the sprit and bolting it thru the deck with a backing plate. A new chain pipe was added so that the chain would fall strait down from the windlass. I was able to pick up a 45 lbs. Chinese made CQR but in the near future will be getting a Rocna 45 to sit beside it with 275’ of 5/16” high test chain. The 35 lbs. Bruce that came with the boat was sold to a friend with a Hunter 28 and he is using it as his primary. The boat also has a Danforth anchor on the stern. I mounted a 6” PVC pipe under the bumpkin and pushed the anchor shank into it. Then just tied a line from the anchor to a cleat to keep it from coming out. The anchor can immediately be deployed by releasing the cleated line. It’s a little tight under the bumpkin because there is a rudder there that is part of the Auto-Helm self steering vane. The only thing I’ve had to do on the vane is add new control lines and one bolt on the rudder mount.
There is still some more things to do before we slip the dock lines but the list is getting very small. Hope the read wasn’t too dry for ya but thems the facts mam.
below are some pics of before and after..

the day we surveyed the boat


what the inside looked like when we bought the boat


Nice Post. Really dinghy foot pump works very good. You should try this.
ReplyDelete